# java spring
# hello world
jdk 22 不能用,换成 17 能用
MainApp.java
import org.springframework.context.ApplicationContext; | |
import org.springframework.context.support.ClassPathXmlApplicationContext; | |
public class MainApp { | |
public static void main(String[] args) { | |
ApplicationContext context = new ClassPathXmlApplicationContext("Beans.xml"); | |
HelloWorld obj = (HelloWorld) context.getBean("helloWorld"); | |
obj.getMessage(); | |
} | |
} |
HelloWorld.java
public class helloWorld { | |
private String message; | |
public void setMessage(String message) { | |
this.message = message; | |
} | |
public String getMessage() { | |
System.out.println(message); | |
return message; | |
} | |
} |
beans.xml
this should be put under mian.resource
<?xml version="1.0" encoding="utf-8"?> | |
<beans xmlns="http://www.springframework.org/schema/beans" | |
xmlns:xsi="http//www.w3.org/2001/XMLSchema-instance" | |
xsi:schemaLocation="http://www.springframework.org/beans | |
http://www.springframework.org/schema/beans/spring-beans-3.0.xsd"> | |
<beans id="helloWorld" class="main.java.com.HelloWorld"> | |
<property name="message" value="Hello World"/> | |
</beans> | |
</beans> |
# Spring BeanFactory
这个容器我用不了,因为在 spring 5.x 中被移除了,我的是 spring 6.18
package com.tutorialspoint; | |
import org.springframework.beans.factory.InitializingBean; | |
import org.springframework.beans.factory.xml.XmlBeanFactory; | |
import org.springframework.core.io.ClassPathResource; | |
public class MainApp { | |
public static void main(String[] args) { | |
XmlBeanFactory factory = new xmlBeanFactory(new ClassPathResource("Beans.xml")); | |
HelloWorld obj = (HelloWorld) factory.getBean("helloWorld"); | |
obj.getMessage(); | |
} | |
} |
# spring bean 后置处理器
多添加一个
<?xml version="1.0" encoding="utf-8"?> | |
<beans xmlns="http://www.springframework.org/schema/beans" | |
xmlns:xsi="http://www.w3.org/2001/XMLSchema-instance" | |
xsi:schemaLocation="http://www.springframework.org/schema/beans | |
http://www.springframework.org/schema/beans/spring-beans-3.0.xsd"> | |
<bean id="helloWorld" class="com.tutorialspoint.HelloWorld" | |
init-method="init" destroy-method="destroy"> | |
<property name="message" value="likun"/> | |
</bean> | |
<bean class="com.tutorialspoint.InitHelloWorld" /> | |
</beans> |
HelloWorld 加一个 init 一个 destroy
package com.tutorialspoint; | |
public class HelloWorld { | |
private String message; | |
public void setMessage(String message) { | |
this.message = message; | |
} | |
public String getMessage() { | |
System.out.println("your :" + message); | |
return message; | |
} | |
public void init(){ | |
System.out.println("init"); | |
} | |
public void destroy(){ | |
System.out.println("destroy"); | |
} | |
} |
Mainapp 用 context.registerShutdownHook() 来正确关闭
package com.tutorialspoint; | |
import org.springframework.context.support.ClassPathXmlApplicationContext; | |
import org.springframework.context.support.AbstractApplicationContext; | |
import org.springframework.core.SpringVersion; | |
public class MainApp { | |
public static void main(String[] args) { | |
AbstractApplicationContext context = new ClassPathXmlApplicationContext("beans.xml"); | |
HelloWorld obj = (HelloWorld) context.getBean("helloWorld"); | |
obj.getMessage(); | |
context.registerShutdownHook(); | |
} | |
} |
InitHelloWorld.java
package com.tutorialspoint; | |
import org.springframework.beans.factory.config.BeanPostProcessor; | |
import org.springframework.beans.BeansException; | |
public class InitHelloWorld implements BeanPostProcessor { | |
public Object postProcessBeforeInitialization(Object bean, String beanName) throws BeansException { | |
System.out.println("before init" +beanName); | |
return bean; | |
} | |
public Object postProcessAfterInitialization(Object bean, String beanName) throws BeansException { | |
System.out.println("after init" +beanName); | |
return bean; | |
} | |
} |
# 依赖注入
# 基于构造函数的依赖注入
MainApp.java
package com.tutorialspoint; | |
import org.springframework.context.ApplicationContext; | |
import org.springframework.context.support.ClassPathXmlApplicationContext; | |
public class MainApp { | |
public static void main(String[] args) { | |
ApplicationContext context = new ClassPathXmlApplicationContext("Beans.xml"); | |
TextEditor te = (TextEditor) context.getBean("textEditor"); | |
te.spellCheck(); | |
} | |
} |
TextEditor.java
package com.tutorialspoint; | |
public class TextEditor { | |
private SpellChecker spellChecker; | |
public TextEditor(SpellChecker spellChecker) { | |
System.out.println("2"); | |
this.spellChecker = spellChecker; | |
} | |
public void spellCheck() { | |
spellChecker.checkSpelling(); | |
} | |
} |
SpellChecker.java
package com.tutorialspoint; | |
public class SpellChecker { | |
public SpellChecker() { | |
System.out.println("1"); | |
} | |
public void checkSpelling() { | |
System.out.println("3"); | |
} | |
} |
Beans.xml
<?xml version="1.0" encoding="UTF-8"?> | |
<beans xmlns ="http://www.springframework.org/schema/beans" | |
xmlns:xsi="http://www.w3.org/2001/XMLSchema-instance" | |
xsi:schemaLocation="http://www.springframework.org/schema/beans | |
http://www.springframework.org/schema/beans/spring-beans.xsd"> | |
<bean id ="textEditor" class="com.tutorialspoint.TextEditor"> | |
<constructor-arg ref="spellChecker"/> | |
</bean> <!-- ref 是引用,value 是值 --> | |
<!-- 向 TextEditor 注入 spellChecker--> | |
<bean id="spellChecker" class="com.tutorialspoint.SpellChecker"> | |
</bean> | |
</beans> |
# 基于设置函数的依赖注入
在 TextEditor.java 中加入
public SpellChecker getSpellChecker(){ | |
return spellChecker; | |
} |
把之前的类换成函数
public void setSpellChecker(SpellChecker spellChecker) { | |
System.out.println("Inside setSpellChecker"); | |
this.spellChecker = spellChecker; | |
} |
Beans.xml
把 <constructor-arg/> 转成 <property name="spellChecker"
# inner beans
在设置函数依赖注入的基础上修改 Beans.xml
<bean id ="textEditor" class="com.tutorialspoint.TextEditor"> | |
<property name="spellChecker"> | |
<bean id="spellChecker" class="com.tutorialspoint.SpellChecker"/> | |
</property> | |
</bean> |
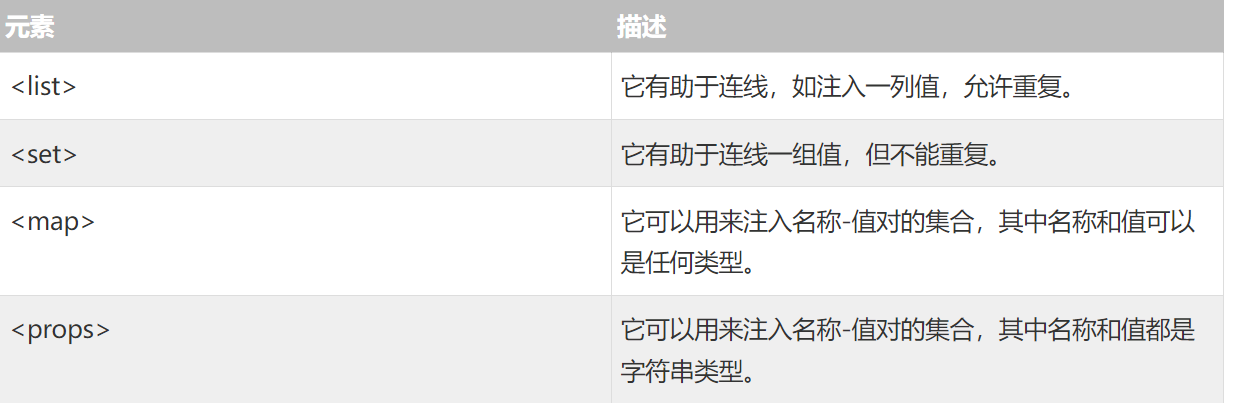
# 注入集合
spring 提供了四种类型的集合配置元素
JavaCollection.java
package com.tutorialspoint; | |
import java.util.*; | |
public class JavaCollection { | |
List addressList; | |
Set addressSet; | |
Map addressMap; | |
Properties addressProp; | |
// a setter method to set List | |
public void setAddressList(List addressList) { | |
this.addressList = addressList; | |
} | |
// prints and returns all the elements of the list. | |
public List getAddressList() { | |
System.out.println("List Elements :" + addressList); | |
return addressList; | |
} | |
// a setter method to set Set | |
public void setAddressSet(Set addressSet) { | |
this.addressSet = addressSet; | |
} | |
// prints and returns all the elements of the Set. | |
public Set getAddressSet() { | |
System.out.println("Set Elements :" + addressSet); | |
return addressSet; | |
} | |
// a setter method to set Map | |
public void setAddressMap(Map addressMap) { | |
this.addressMap = addressMap; | |
} | |
// prints and returns all the elements of the Map. | |
public Map getAddressMap() { | |
System.out.println("Map Elements :" + addressMap); | |
return addressMap; | |
} | |
// a setter method to set Property | |
public void setAddressProp(Properties addressProp) { | |
this.addressProp = addressProp; | |
} | |
// prints and returns all the elements of the Property. | |
public Properties getAddressProp() { | |
System.out.println("Property Elements :" + addressProp); | |
return addressProp; | |
} | |
} |
MainApp.java
package com.tutorialspoint; | |
import org.springframework.context.ApplicationContext; | |
import org.springframework.context.support.ClassPathXmlApplicationContext; | |
public class MainApp { | |
public static void main(String[] args) { | |
ApplicationContext context = | |
new ClassPathXmlApplicationContext("Beans.xml"); | |
JavaCollection jc=(JavaCollection)context.getBean("javaCollection"); | |
jc.getAddressList(); | |
jc.getAddressSet(); | |
jc.getAddressMap(); | |
jc.getAddressProp(); | |
} | |
} |
Beans.xml
<?xml version="1.0" encoding="UTF-8"?> | |
<beans xmlns="http://www.springframework.org/schema/beans" | |
xmlns:xsi="http://www.w3.org/2001/XMLSchema-instance" | |
xsi:schemaLocation="http://www.springframework.org/schema/beans | |
http://www.springframework.org/schema/beans/spring-beans-3.0.xsd"> | |
<!-- Definition for javaCollection --> | |
<bean id="javaCollection" class="com.tutorialspoint.JavaCollection"> | |
<!-- results in a setAddressList(java.util.List) call --> | |
<property name="addressList"> | |
<list> | |
<value>INDIA</value> | |
<value>Pakistan</value> | |
<value>USA</value> | |
<value>USA</value> | |
</list> | |
</property> | |
<!-- results in a setAddressSet(java.util.Set) call --> | |
<property name="addressSet"> | |
<set> | |
<value>INDIA</value> | |
<value>Pakistan</value> | |
<value>USA</value> | |
<value>USA</value> | |
</set> | |
</property> | |
<!-- results in a setAddressMap(java.util.Map) call --> | |
<property name="addressMap"> | |
<map> | |
<entry key="1" value="INDIA"/> | |
<entry key="2" value="Pakistan"/> | |
<entry key="3" value="USA"/> | |
<entry key="4" value="USA"/> | |
</map> | |
</property> | |
<!-- results in a setAddressProp(java.util.Properties) call --> | |
<property name="addressProp"> | |
<props> | |
<prop key="one">INDIA</prop> | |
<prop key="two">Pakistan</prop> | |
<prop key="three">USA</prop> | |
<prop key="four">USA</prop> | |
</props> | |
</property> | |
</bean> | |
</beans> |
# 注入空字符串
<bean id="..." class="exampleBean">
   <property name="email" value=""/>
</bean>
相当于 Java 代码: exampleBean.setEmail("")
# 注入 NULL
<bean id="..." class="exampleBean"> | |
<property name="email"><null/></property> | |
</bean> |
相当于 Java 代码: exampleBean.setEmail(null)
# 自动装配 beans
# byname
| 模式 | 描述 |
|---|---|
| no | 这是默认的设置,它意味着没有自动装配,你应该使用显式的 bean 引用来连线。你不用为了连线做特殊的事。在依赖注入章节你已经看到这个了。 |
| byName | 由属性名自动装配。Spring 容器看到在 XML 配置文件中 bean 的自动装配的属性设置为 byName。然后尝试匹配,并且将它的属性与在配置文件中被定义为相同名称的 beans 的属性进行连接。 |
| byType | 由属性数据类型自动装配。Spring 容器看到在 XML 配置文件中 bean 的自动装配的属性设置为 byType。然后如果它的类型匹配配置文件中的一个确切的 bean 名称,它将尝试匹配和连接属性的类型。如果存在不止一个这样的 bean,则一个致命的异常将会被抛出。 |
| constructor | 类似于 byType,但该类型适用于构造函数参数类型。如果在容器中没有一个构造函数参数类型的 bean,则一个致命错误将会发生。 |
| autodetect(3.0 版本不支持) | Spring 首先尝试通过 constructor 使用自动装配来连接,如果它不执行,Spring 尝试通过 byType 来自动装配。 |
例如,在配置文件中,如果一个 bean 定义设置为自动装配 byName,并且它包含 spellChecker 属性(即,它有一个 setSpellChecker(…) 方法),那么 Spring 就会查找定义名为 spellChecker 的 bean,并且用它来设置这个属性。你仍然可以使用
这里是 TextEditor.java 文件的内容:
package com.tutorialspoint; | |
public class TextEditor { | |
private SpellChecker spellChecker; | |
private String name; | |
public void setSpellChecker( SpellChecker spellChecker ){ | |
this.spellChecker = spellChecker; | |
} | |
public SpellChecker getSpellChecker() { | |
return spellChecker; | |
} | |
public void setName(String name) { | |
this.name = name; | |
} | |
public String getName() { | |
return name; | |
} | |
public void spellCheck() { | |
spellChecker.checkSpelling(); | |
} | |
} |
下面是另一个依赖类文件 SpellChecker.java 的内容:
package com.tutorialspoint; | |
public class SpellChecker { | |
public SpellChecker() { | |
System.out.println("Inside SpellChecker constructor." ); | |
} | |
public void checkSpelling() { | |
System.out.println("Inside checkSpelling." ); | |
} | |
} |
下面是 MainApp.java 文件的内容:
package com.tutorialspoint; | |
import org.springframework.context.ApplicationContext; | |
import org.springframework.context.support.ClassPathXmlApplicationContext; | |
public class MainApp { | |
public static void main(String[] args) { | |
ApplicationContext context = | |
new ClassPathXmlApplicationContext("Beans.xml"); | |
TextEditor te = (TextEditor) context.getBean("textEditor"); | |
te.spellCheck(); | |
} | |
} |
下面是在正常情况下的配置文件 Beans.xml 文件:
<?xml version="1.0" encoding="UTF-8"?> | |
<beans xmlns="http://www.springframework.org/schema/beans" | |
xmlns:xsi="http://www.w3.org/2001/XMLSchema-instance" | |
xsi:schemaLocation="http://www.springframework.org/schema/beans | |
http://www.springframework.org/schema/beans/spring-beans-3.0.xsd"> | |
<!-- Definition for textEditor bean --> | |
<bean id="textEditor" class="com.tutorialspoint.TextEditor"> | |
<property name="spellChecker" ref="spellChecker" /> | |
<property name="name" value="Generic Text Editor" /> | |
</bean> | |
<!-- Definition for spellChecker bean --> | |
<bean id="spellChecker" class="com.tutorialspoint.SpellChecker"> | |
</bean> | |
</beans> |
但是,如果你要使用自动装配 “byName”,那么你的 XML 配置文件将成为如下:
<?xml version="1.0" encoding="UTF-8"?> | |
<beans xmlns="http://www.springframework.org/schema/beans" | |
xmlns:xsi="http://www.w3.org/2001/XMLSchema-instance" | |
xsi:schemaLocation="http://www.springframework.org/schema/beans | |
http://www.springframework.org/schema/beans/spring-beans-3.0.xsd"> | |
<!-- Definition for textEditor bean --> | |
<bean id="textEditor" class="com.tutorialspoint.TextEditor" | |
autowire="byName"> | |
<property name="name" value="Generic Text Editor" /> | |
</bean> | |
<!-- Definition for spellChecker bean --> | |
<bean id="spellChecker" class="com.tutorialspoint.SpellChecker"> | |
</bean> | |
</beans> |
# bytype
但是,如果你要使用自动装配 “byType” ,那么你的 XML 配置文件将成为如下:
<?xml version="1.0" encoding="UTF-8"?> | |
<beans xmlns="http://www.springframework.org/schema/beans" | |
xmlns:xsi="http://www.w3.org/2001/XMLSchema-instance" | |
xsi:schemaLocation="http://www.springframework.org/schema/beans | |
http://www.springframework.org/schema/beans/spring-beans-3.0.xsd"> | |
<!-- Definition for textEditor bean --> | |
<bean id="textEditor" class="com.tutorialspoint.TextEditor" | |
autowire="byType"> | |
<property name="name" value="Generic Text Editor" /> | |
</bean> | |
<!-- Definition for spellChecker bean --> | |
<bean id="SpellChecker" class="com.tutorialspoint.SpellChecker"> | |
</bean> | |
</beans> |
# by 构造函数
先把 TextEditor 写成构造函数形式
如果你要使用自动装配 “by constructor”,那么你的 XML 配置文件将成为如下:
<?xml version="1.0" encoding="UTF-8"?> | |
<beans xmlns="http://www.springframework.org/schema/beans" | |
xmlns:xsi="http://www.w3.org/2001/XMLSchema-instance" | |
xsi:schemaLocation="http://www.springframework.org/schema/beans | |
http://www.springframework.org/schema/beans/spring-beans-3.0.xsd"> | |
<!-- Definition for textEditor bean --> | |
<bean id="textEditor" class="com.tutorialspoint.TextEditor" | |
autowire="constructor"> | |
<constructor-arg value="Generic Text Editor"/> | |
</bean> | |
<!-- Definition for spellChecker bean --> | |
<bean id="SpellChecker" class="com.tutorialspoint.SpellChecker"> | |
</bean> | |
</beans> |
# 基于注解的配置
spring 2.5
在可以使用基于注解的连线之前,我们将需要在我们的 Spring 配置文件中启用它。所以如果你想在 Spring 应用程序中使用的任何注解,可以考虑到下面的配置文件。
<?xml version="1.0" encoding="UTF-8"?> | |
<beans xmlns="http://www.springframework.org/schema/beans" | |
xmlns:xsi="http://www.w3.org/2001/XMLSchema-instance" | |
xmlns:context="http://www.springframework.org/schema/context" | |
xsi:schemaLocation="http://www.springframework.org/schema/beans | |
http://www.springframework.org/schema/beans/spring-beans-3.0.xsd | |
http://www.springframework.org/schema/context | |
http://www.springframework.org/schema/context/spring-context-3.0.xsd"> | |
<context:annotation-config/> | |
<!-- bean definitions go here --> | |
</beans> |
| 序号 | 注解 & 描述 |
|---|---|
| 1 | @Required@Required 注解应用于 bean 属性的 setter 方法。 |
| 2 | @Autowired@Autowired 注解可以应用到 bean 属性的 setter 方法,非 setter 方法,构造函数和属性。 |
| 3 | @Qualifier 通过指定确切的将被连线的 bean,@Autowired 和 @Qualifier 注解可以用来删除混乱。 |
| 4 | JSR-250 AnnotationsSpring 支持 JSR-250 的基础的注解,其中包括了 @Resource,@PostConstruct 和 @PreDestroy 注解。 |
# @Required
它表明受影响的 bean 属性在配置时必须放在 XML 配置文件中,否则容器就会抛出一个 BeanInitializationException 异常。
🔞逆天了 spring 在 4.3 以上的版本中就把 Required 废弃了
# @Autowired
使用 Spring 开发时,进行配置主要有两种方式,一是 xml 的方式,二是 java config 的方式。
将 @Autowired 注解应用于构造函数,example:
public class MovieRecommender { | |
private final CustomerPreferenceDao customerPreferenceDao; | |
@Autowired | |
public MovieRecommender(CustomerPreferenceDao customerPreferenceDao) { | |
this.customerPreferenceDao = customerPreferenceDao; | |
} | |
// ... | |
} |
将 @Autowired 注解应用于 setter 方法,example:
public class SimpleMovieLister { | |
private MovieFinder movieFinder; | |
@Autowired | |
public void setMovieFinder(MovieFinder movieFinder) { | |
this.movieFinder = movieFinder; | |
} | |
// ... | |
} |
将 @Autowired 注解应用于具有任意名称和多个参数的方法:
public class MovieRecommender { | |
private MovieCatalog movieCatalog; | |
private CustomerPreferenceDao customerPreferenceDao; | |
@Autowired | |
public void prepare(MovieCatalog movieCatalog, | |
CustomerPreferenceDao customerPreferenceDao) { | |
this.movieCatalog = movieCatalog; | |
this.customerPreferenceDao = customerPreferenceDao; | |
} | |
// ... | |
} |
也可以将 @Autowired 注解应用于字段,或者将其与构造函数混合,如以下示例所示:
public class MovieRecommender { | |
private final CustomerPreferenceDao customerPreferenceDao; | |
@Autowired | |
private MovieCatalog movieCatalog; | |
@Autowired | |
public MovieRecommender(CustomerPreferenceDao customerPreferenceDao) { | |
this.customerPreferenceDao = customerPreferenceDao; | |
} | |
// ... |
还有其他的例如将 @Autowired 注解添加到需要该类型数组的字段或方法,则 Spring 会从 ApplicationContext 中搜寻符合指定类型的所有 bean。当然容器 set 也可以
# @Qualifier
当你创建多个具有相同类型的 bean 时,并且想要用一个属性只为它们其中的一个进行装配,在这种情况下,你可以使用 **@Qualifier** 注解和 **@Autowired** 注解通过指定哪一个真正的 bean 将会被装配来消除混乱。